DIY Boot Repair: Fix Scuffs, Stains & Sole Separation | Boots by TL
Boot Care · 2026-04-12
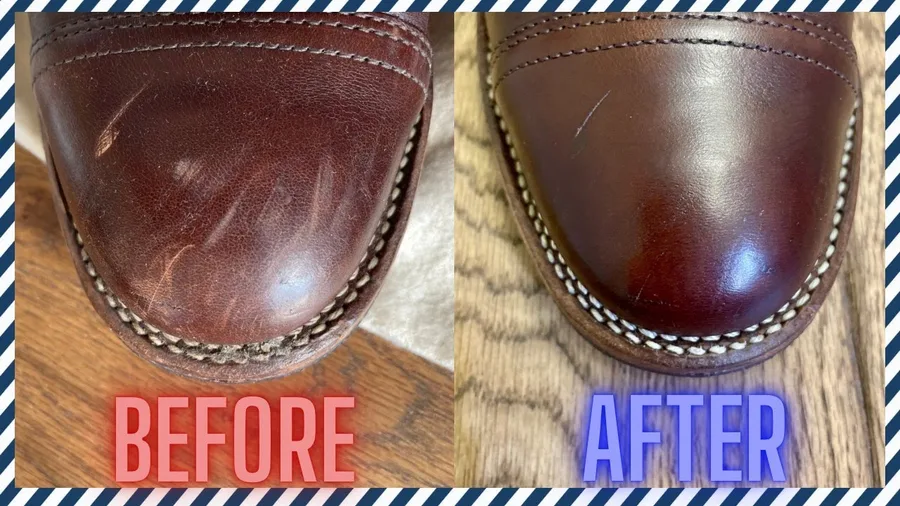
Reviving Worn-Out Boots: DIY Tips for Scuffs, Stains, and Sole Repair
Even the most cherished pair of leather boots can show signs of wear and tear over time. Scuffs, stains, and minor sole damage are inevitable, but they don't have to spell the end for your favorite footwear. With a few simple DIY techniques, you can revive your worn-out boots, extending their life and restoring their former glory. This guide will equip you with the knowledge to tackle common boot ailments at home.
Understanding Common Boot Ailments
Before diving into repairs, it's helpful to understand the types of damage your boots might incur:
- Scuffs: Surface abrasions where the top layer of leather has been rubbed off, often revealing a lighter color underneath.
- Stains: Discoloration caused by water, oil, salt, or other substances.
- Minor Sole Separation: Small gaps appearing between the sole and the upper, often at the toe or heel.
- Heel Wear: The heel cap wearing down, exposing the underlying material.
DIY Solutions for Common Boot Problems
1. Tackling Scuffs and Scratches
Scuffs are perhaps the most common cosmetic issue for leather boots. The good news is, they're often the easiest to fix.
- Clean the Area: Begin by cleaning the scuffed area with a damp cloth to remove any dirt or debris. Allow it to dry completely.
- Heat Treatment (for minor scuffs): For very minor scuffs, gently heat the area with a hairdryer on a low setting. This can make the leather more pliable and help it re-bond. Immediately after heating, massage the scuffed area with a clean cloth or your finger [1] [2].
- Colored Polish or Cream: For more noticeable scuffs, use a colored leather polish or cream that matches your boot's color. Apply a small amount to the scuff with a soft cloth, rubbing it in gently. The pigment in the polish will help to cover the discoloration. Buff off any excess [3].
- Leather Dye (for deep scuffs): For deep scuffs where the color is significantly lost, a leather dye might be necessary. Apply carefully with a small brush or applicator, following the product instructions, then condition and polish.
2. Removing Stubborn Stains
Different stains require different approaches. Always test any cleaning solution on an inconspicuous area first.
- Water Stains: Gently wipe the entire boot with a damp cloth to even out the moisture. Stuff the boots with newspaper and let them air dry away from direct heat. Once dry, condition the leather.
- Salt Stains: Mix equal parts white vinegar and water. Dip a cloth into the solution and gently wipe the salt stains. Rinse with a clean damp cloth and allow to dry, then condition.
- Oil/Grease Stains: Sprinkle cornstarch or talcum powder generously over the stain and let it sit overnight to absorb the oil. Brush off the powder and repeat if necessary. For fresh stains, a specialized leather degreaser might be effective.
3. Addressing Minor Sole Separation
Small gaps between the sole and the upper can often be fixed at home with the right adhesive.
- Clean and Dry: Ensure the separated area is clean and completely dry. Use a toothpick or small brush to remove any dirt from the gap.
- Apply Adhesive: Apply a thin, even layer of shoe repair adhesive (e.g., Shoe Goo, Barge Cement) into the gap. Use a clamp or heavy objects to hold the separated parts together firmly.
- Cure Time: Allow the adhesive to cure for the recommended time, usually 24-48 hours, before wearing the boots.
When to Seek Professional Help
While many minor issues can be resolved at home, some problems are best left to a professional cobbler. Consider professional repair for:
- Extensive sole damage or complete sole replacement.
- Broken zippers or significant hardware issues.
- Deep tears or rips in the leather.
- Major structural damage.
Prevention is Key
The best way to revive worn-out boots is to prevent them from getting too worn in the first place. Regular cleaning, conditioning, and protection (as outlined in "The Ultimate Guide to Leather Boot Care") will significantly reduce the need for extensive repairs. Additionally, rotating your footwear and using shoe trees can prolong their life.
Conclusion
Don't let a few scuffs or a minor sole separation deter you from enjoying your favorite boots. With these DIY tips, you can confidently tackle common wear and tear, keeping your leather boots looking their best and extending their journey with you. Embrace the character that comes with age, and give your boots the care they deserve.
References
[1] Ariat. (2020, November 11). How to Fix Scuffed Leather Boots & Shoes. Retrieved from https://www.ariat.com/al/how-to-fix-scuffed-leather-boots-shoes [2] Farm Store. (2022, December 27). How to Fix Scuffed Leather Boots and Shoes. Retrieved from https://www.farmstore.com/blog/fixing-scuffed-boots-and-shoes [3] Samuel Hubbard. (2020, February 10). How To Fix Scuffs & Scratches In Leather Shoes. Retrieved from https://samuelhubbard.com/blogs/journal/removing-repairing-leather-shoe-scuffs-scratches